

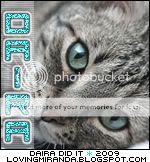
This is what we are going to create.
Needed:
A Cat's Face Image (preferably a cat that has color eyes, like mine)
Font of your Choice (I used Nec Plus Ultra) HERE
DSB Flux (Bright Noise)
Eyecandy 4000 (Gradient Glow)
Toadies (Old Photo)
~Let's begin!~
1. Open a New Image 150x150 - floodfill white - Promote Background Layer - Open your cat's face image - Copy - Paste as New Layer in your 150x150 image.
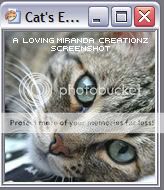
2. Using your Move Tool arrange part of the Cat's Face in the middle of our Image, remember that this time we are trying to focusing on the eyes of the cat. This is how I arranged mine:
3. Select the Background Layer in your Layer Pallette - Go to Selections - Select All - Float - Defloat - And now select the Cat Layer - Make sure that you see little ants running around the layer - Go to Selections - Promote Selection to Layer - Deselect - Rename this layer Cat's Eyes and delete the cat original layer.
4. Set your FreeHand Selections Tool with this settings:

*You can use the Freehand or Point-to-point selection, whichever you feel more comfortable with, I prefer the Point-to-point, but is your choice.
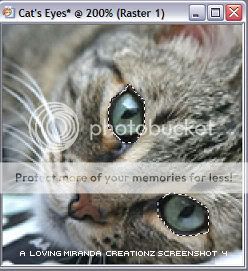
5. Zoom in your image a little for you to be able to see where to trace, makes it easier this way (I zoomed mine to 200% - start tracing around one of your cat's eyes - when finished right click your mouse and it will select the entire eye - do the same with the other eye - This is how I did in mine:
6. Now that we have selected around our two eyes - Go to Selections - Promote Selection to Layer - Deselect - Rename this layer Eyes.
7. Highlight the Cat's Eyes Layer in your Pallette - Apply Toadies - Old Photo effect with settings:
138 - 89 - 103 - OK.
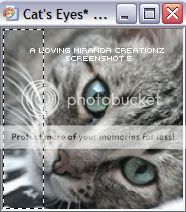
8. Add a New Raster Layer above the Eyes Layer - Rename layer as Blinds - With your Selection Tool draw out a rectangle in the left side of our Image, make it kinda thick so that you get space to put your name later - Like this:
9. Floodfill this layer with color white - Deselect - Apply Texture Effect - Blinds - with these Settings:
Width - 2, Opacitiy - 20, Horizontal and Light from Left/Top ticked, Black color. Set the Opacity of this layer to 40.
10. Add your text in a New Raster Layer - I used font Nec Plus Ultra - as Floating - Direction (Text Flow) Vertical & Left - Size 20 (depends on how long your name is, mine is short) - Stroke width 1px - Bold - Anti-alas Sharp - Kerning -100 - All in CAPs letter - Foreground & Background with color #38d6dc.
11. Arrange text on left side in the middle of the rectangle - Deselect - Duplicate this layer - Merge down this two layers - Apply Bright Noise with Intesity of 80, Mix - OK - Add Gradient Glow with Settings : Basic - Glow 3 - Corners 0 - Opacity 100 | Color - Fat - Black - OK - Drop desire Shadow.
12. Add New Raster Layer - Selections - Modify - Contract - 1px - OK - Selections - Invert - Floodfill with color Black - Deselect.
13. To add your credits make your Canvas Size a little bigger, and add your watermark.
14. Merge down all layers visible - save as jpge.
And we are done!
I hope you have enjoyed my tutorial and your new signature tag :).
~xoxo
Daira
This tutorial was written by Daira on August 29th, 2009 for Loving Miranda Creationz.
The concept of this tutorial is copyrighted to me, so whatever you create using my tutorial are yours,
as long as the results are not use for any kind of profit.
Feel free to print out this tutorial for your own personal use, or you may share my link with others,
but do not attemp to claim as your own.


No comments:
Post a Comment